This is a quick tutorial for what I call an “Eddie Cap”- that’s Eddie up there ^ . I still consider myself a new sewer so I’m sure there are many other and better ways to accomplish some of these steps, but this is how I do it. 😉
In this tutorial, I will be sewing a cap which will fit a 4-6 year old. I will try to point out the steps that you will need to adjust if you are making a smaller or larger cap.
Okay, now get your stuff together:
- A little less than ½ yard medium to heavy weight cotton, canvas or as in this tutorial, I used wool.
- Lightweight Interfacing for bill and one band
- Scissors
- Ruler
- Chalk or something temporary to mark the fabric
- Pins
- Sewing machine with matching thread (with a Walking Foot if you have one, but it’s not necessary)
- Iron
Seam allowances are ½” unless directed otherwise.
This tutorial is meant for personal use. Please do not sell Eddie Caps made from this tutorial.
Ready? Here we go:
1. Measure the largest part of the head for your cap to get your circumference. For my boys, their heads are about 21″.
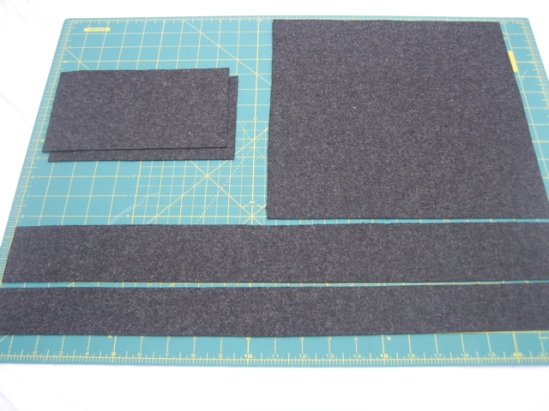
2. Cut out your pieces:
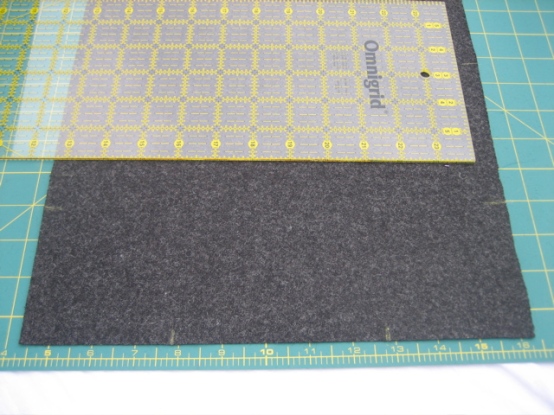
- Cut two bands– the length of both bands will be the circumference of your head + 1″ ease + 1″ seam allowances. So for my hats, it was 21″ + 1″ + 1″ = 23″ inches for my band lengths. For the widths, one band should be 2″ x 23″ for the inside of the cap and the other should measure 2 ½” x 23″ for the outside band.
- Cut two rectangles measuring 8½” x 5″.
- Cut one 12″ square.
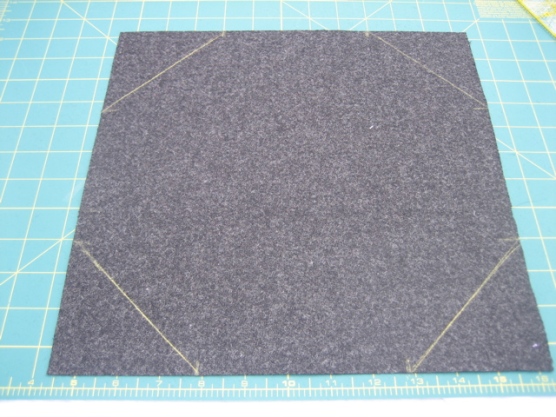
3. Make your 12″ square into an octagon with 5″ sides:
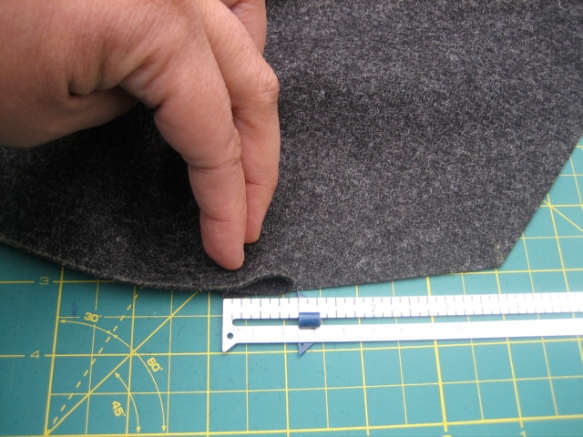
- Measure 3½” in both horizontally and vertically from each corner and mark.
- Connect your marks at each corner using your ruler to form a triangle.
- Check your work to be sure all your sides will be about 5″ before cutting.
- Cut off triangles at each corner. Viola! You have your octagon.
Please note that this is not a “perfect” octagon, but that it’s sides are about 5″.
(I think this size octagon should work for one size smaller or larger caps ranging in head circumferences of +/- 1 inch.)
4. Make your bill:
- Stack you rectangles making sure everything is lined up.
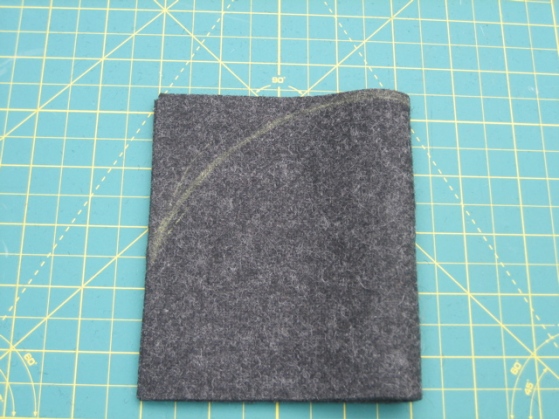
- Fold rectangles in half long-wise so that it measures 4¼” x 5″.
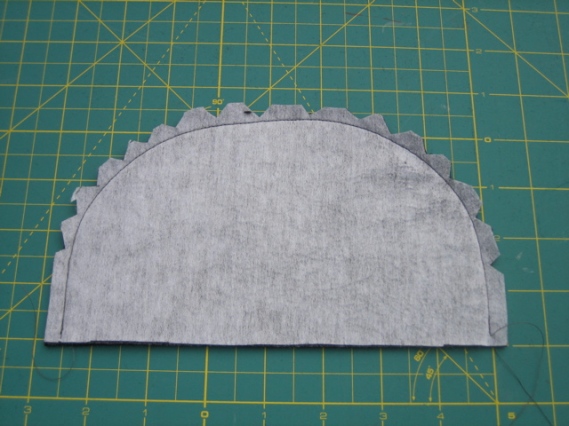
- Draw a wide curve starting about 2 inches up from the bottom at the side edge and ending at the top of the fold.
- Cut on your line.
- Open and make any adjustments for the shape of bill you desire.
- Apply interfacing. (The type of interfacing here will depend on how stiff you want your bill. For mine, I like the softer look so I used lightweight stuff that was fusible for easy application. Also, I applied it to only one piece which I will use as the top of the bill.)
5. Sew bill:
- With right sides together, stitch around outside curved edge leaving the bottom straight edge open.
- Trim seam and clip at curves.
- Turn and press making sure all seams are pushed out. (I like to use a chopstick.)
- Topstitch if desired. (I’ve tried both with and without, but prefer 3 to 4 rows of topstitching for a more finished look.)
- Cut a curve across bottom open edge to somewhat match the top curve of the bill and set aside. * After making these a few more times, I’ve found that you should be cutting off a lot here. In the middle of the bill- the middle of your arch, the bill should only measure about 3″ wide and 4″ wide at the ends. Otherwise, your bill will be too long and floppy.
6. Now for the bands:
- Apply interfacing to the wider, 2½” x 23″ Outside band. (For this, I like to use lightweight double-sided interfacing to help keep the hemming in place on Step 11.)
- Sew each band together at sides to make 2 circles. Press seams open. Be sure right sides are together and for the interfaced band, the interfacing should be on the inside.
- Overcast, zigzag or pink along one long edge of the 2″ x 23″ Inside band.
7. Next, find your bill and baste bill to interfaced band, right sides together, making sure the band seam is in the back.
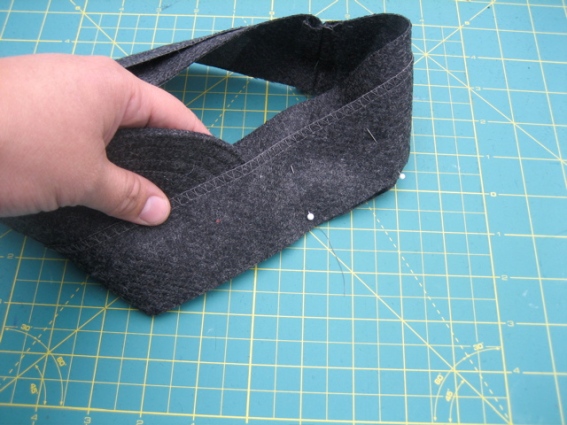
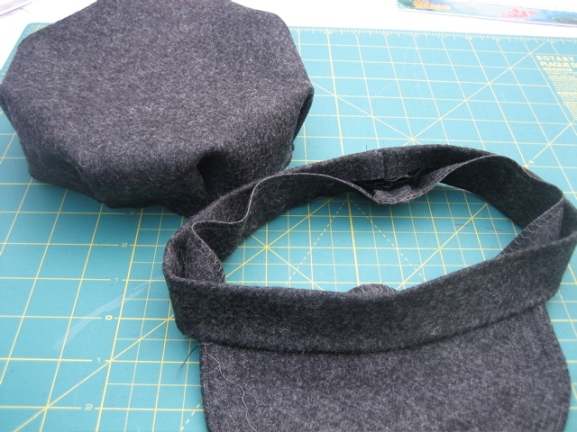
8. Sew together bands at bottom edge sandwiching bill making sure right sides are together and the band seams are lined up in the back. For the Inside band, make sure the edge you finished in Step 6 is free and is NOT the edge that is sewn together to the Outside band. (The finished edge will be flipped up into the cap and sewn onto the top portion of the cap once it’s all put together.)
In this photo above, the bands are pinned with right sides together. Your seam should be at the bottom edge where the pin heads are in the photo. Don’t worry if the bands don’t fit together perfectly so don’t do any trimming! When you sew them together, it all works out and it fits.
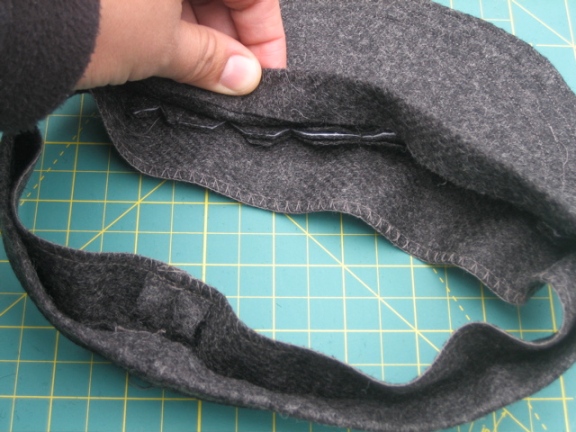
Here you see the bands are stitched together, but the Inside finished edge is free.
9. Clip curve at bill and press seam together.
10. Press Outside band folding down 1/2″ to form hem at the top of the band. Be sure that the Inside finished edge extends a little beyond the folded Outside band so that it can be easily stitched down with the top of cap.
11. Form top of cap:
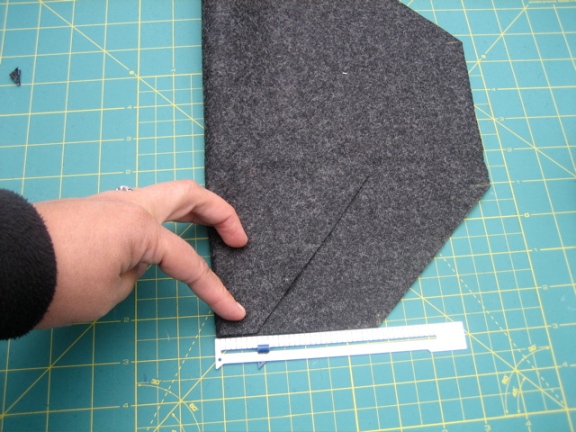
- Starting at one edge of the octagon with the wrong side facing up, fold in point 1″ matching bottom edges.
- Now fold the top back, keeping the edges lined up and pin.
- Now fold the other side. To be sure you have it right, once it’s folded and pined, the edge should form a curved edge. Also, the inside folds should look like a “V” and the outside should have two straight pleats.
- Work your way around to form 4 sets of two pleats, one for each side and one for the front and back of cap. Once all 4 sets are pinned, your cap top should form a nice bowl like so, making sure the wrong side of your fabric is the inside of the bowl:
- Baste around the cap to keep pleats in place. I usually baste all the pleats except two. These two will be in the back of the cap and are loose so I can make any needed adjustments to fit the top of the cap perfectly into band. (Also, if you are making a different size cap, you may want to pin your cap onto the band before basting to check the fit. You may need to adjust all the pleats if it’s way off.)
12. Now, baste the top of cap to the inside finished edge of the band, but be sure that the front pleat is lined up with the middle of the bill or else it will look funky if it’s off.
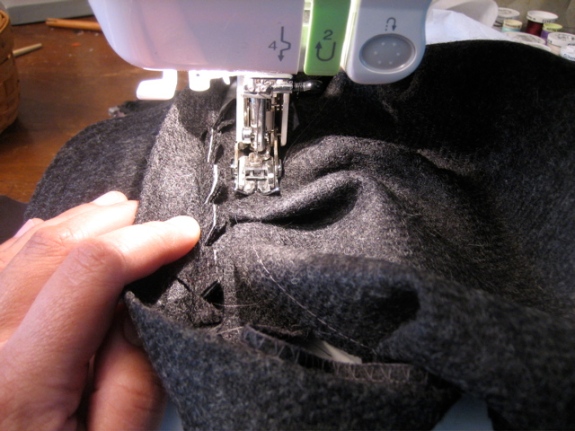
Start sewing in the front of the cap and work around in each direction ending at the back seams. This is when you may need to do some adjusting of the back pleats to fit your cap top into your band.
13. Once everything fits good and there’s no puckering, fold over outside band and topstitch all layers with the outside band on top.
Try to stay as close to the top edge was possible while neatly sewing the inside band in place as well. (This is where things can get a little hard to keep in place if you’re not using a Walking Foot. Go slowly and watch your layers.)
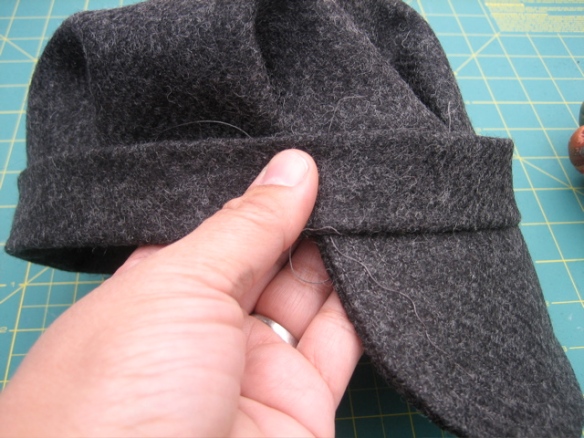
14. Check all your seams for any puckering or missed edges and try it on.
15. And finally, find a comfy spot to sit, get your sharp seam ripper, and take out the basting stitches on the inside of the cap.
TA-DA, You are done!
Now take a picture of your cutie in his (or her) cap and post it on Flickr’s “Eddie Cap” group for all of us to admire.
Please let me know if you have any questions or if I need to clarify any steps. 🙂














Posted by thedomesticdiva on November 25, 2007 at 3:41 am
Great tutorial of such an adorable hat!
The only thing I would do different would be on Step 5…I’d use a double needle and an edge stitching foot so my topstitching would come out parallel.
Thanks so much for sharing! You rock!
With friendship,
Lisa
Posted by Judi M on September 1, 2011 at 1:22 pm
I’m a ‘return’ seamstress and think this will
be a very nice gift for my husband who has
had some hats that looked very similar to
this one. Loved your tutorial and pattern
Thank you so much
Judi Meissner/Knox, IN
Posted by kim on June 9, 2014 at 8:14 pm
lisa, love the hat, and my little Owen can’t wait to wear his when he plays with Thomas.
You pattern is based on a hexagon not an octagon….. and we thought high school geometry would never be used! Ha…. you threw me there for a minute.
Kim
Posted by Lois on August 5, 2014 at 3:40 am
Looks like an octagon to me – eight sides. A hexagon has six sides. Time for a geometry review?
Posted by Teodoro Gutierrez on April 10, 2020 at 5:14 pm
muy bueno gracias
Posted by Angie on November 25, 2007 at 4:13 am
Oh my goodness! Such of a wonderful hat but also an awesome tutorial! Very well written. I’ll have to give this hat a try. Thank you very much!
Posted by Eva on November 27, 2007 at 9:39 pm
Thank you very much, I’ll try it as soon as I buy some wool.
Posted by Becca on December 2, 2007 at 12:23 am
I think this will be an immediate project! thank you!
Posted by Karla on December 2, 2007 at 5:07 am
Oh my – this is ADORABLE! Thank you for sharing!
Posted by paperseed on December 4, 2007 at 6:09 am
Thanks for providing such an easy to follow tutorial. I wonder if my sewing skills can handle something as cool as this!
Posted by bitterbetty on December 4, 2007 at 3:24 pm
i love this… thanks!
Posted by jeanielangdon on December 4, 2007 at 3:35 pm
Sooo so so cute! I want to make a pink one for my little girl! Thanks for the tutorial!
Posted by Chantel on December 4, 2007 at 3:50 pm
I love this hat, I don’t know If I am up to it but my little guy would look Darling!
I thank you for sharing!
Posted by melissa on December 4, 2007 at 4:00 pm
SO CUTE!!!
Posted by Cheyenne on December 5, 2007 at 12:42 am
So cute! I posted a link on my blog.
Posted by Sonia on February 26, 2021 at 3:18 pm
Sos una genia ..muy fácil!! Gracias por compartir !!!
Saludos desd argentina !!
Posted by KC on December 5, 2007 at 1:42 am
Great tutorial–never guess you’re a beginning sewer! Cute hat and adorable little guy. Good job!
Posted by Crystal on December 5, 2007 at 3:09 am
oh. my. goodness. TOO CUTE! thanks for the tut!
Posted by Alicia A. on December 20, 2007 at 4:49 am
I need one!
Posted by jOi-C on January 5, 2008 at 8:23 pm
that is really cute!!! i wanna try that for my lil guy, don’t know if i’m brave enough but yeah definitely really cute…
Posted by Faye on January 6, 2008 at 8:23 pm
What a great tutorial! Just getting back into sewing… or trying to anyways…. so thanks for some much needed inspiration!
Posted by The “Eddie Cap” Tutorial is Done! « Mushroom Villagers on February 23, 2008 at 4:07 am
[…] The Eddie Cap Tutorial […]
Posted by Fixed « Mushroom Villagers on March 12, 2008 at 5:24 pm
[…] The Eddie Cap Tutorial […]
Posted by ‘Tis Time « Mushroom Villagers on March 12, 2008 at 5:26 pm
[…] The Eddie Cap Tutorial […]
Posted by kat on April 3, 2008 at 4:45 pm
I want to make one for myself in florals!! Thank you so much for the tutorial. I bookmarked it now can’t wait to make it…maybe this summer??
Posted by Gina on April 8, 2008 at 4:34 am
Wow, its really hard to believe you’re a “new sewer”…really great project and such a cute result. Massive kudos to you!!
Posted by Judith Roenke on April 8, 2008 at 1:59 pm
I am definitely adding this to my project list. My baby is only 6 months old, but I think he needs an Eddie cap.
Posted by Jill on April 9, 2008 at 11:04 am
absolutely adorable! I think I need one for me!
Posted by jane on April 9, 2008 at 1:30 pm
this is great. can’t wait to try it. thanks for sharing. your son is a cutie!
Posted by Not ready for the runway « See Mommy Sew on April 11, 2008 at 11:57 am
[…] 11, 2008 in Sewing, Tutorials Tags: hat, Sewing I’ve had this tutorial bookmarked forever and I finally sewed up my first one for Happy Baby’s birthday. It turned […]
Posted by miftik.com is creative » Blog Archive » Roundup on April 17, 2008 at 2:04 am
[…] Eddie Cap tutorial is for a cute little train engineer type cap. […]
Posted by norahkate on May 3, 2008 at 4:00 am
i just made this for little man and i am so excited! i was a little impatient to get it finished so at the end when it was a little big i just took in the back pleats more rather than going around and adjusting them all. it’s really fine this way though and next time i know to size it a bit smaller. as long as no one examines the back of his hat up close though they’ll never know the difference! my camera is broken so pictures will have to wait until tomorrow, but i couldn’t wait to share…thanks!
Posted by dulcet on May 28, 2008 at 3:29 am
I just decided to make this for a present for my 8 year-old daughter’s friend. But my daughter is very small for her age and I decided not to trust her measurements for a normal size kid. So I took some measurements around the family. 6 year-old’s head circumfrence–21″, 12 year-old–21″, 33 year-old–22 1/4″! Weird. I guess heads don’t grow very much after a certain point. Which makes this tute even better because I don’t have to worry about fiddling with the recommended dimensions!
Posted by Pansy Moss on June 1, 2008 at 7:44 pm
Hi, I just made this today. I had a bit of trouble due to my lack of a walking foot. I have two more to make though, so I hope to do better next time.
Posted by Kopfbedeckungen für Erwachsene - Linkliste (hats, caps and so on, chapeau) | Stoff-Junkie.de on June 17, 2008 at 11:48 am
[…] Schirmmütze […]
Posted by joanie on June 25, 2008 at 2:28 pm
This is bloody gorgeous! Great tutorial too 🙂
Posted by jillomatic on July 9, 2008 at 2:51 pm
I have a old wool coat wanting to be made into a hat!
Posted by Judy on July 27, 2008 at 10:21 pm
How precious! The hat and Eddie!
Posted by Shayla on July 27, 2008 at 11:49 pm
soooo darling
Posted by Kopfbedeckungen für Erwachsene - Linkliste (hats, caps and so on, chapeau) | Kostenlose Schnittmuster on September 8, 2008 at 9:45 am
[…] Schirmmütze […]
Posted by Sara on October 1, 2008 at 2:05 pm
Great!! I´ve tried to do a cap like your Eddie cap but was not 100% successfully… Now that I´ve found your tutorial (googled for tutorial cap) I will do a a new try!! But first I have to browse your blog 🙂
Posted by Finally a cap « ikke tikke theo on October 1, 2008 at 6:55 pm
[…] The other reason was that I actually had no clue how to sew a cap!! I actually wanted to describe here how I ended up doing it BUT today I googled for “tutorial cap” and found a great tutorial! (Yes – why did I not google for it the last months!!??) Anyway, now I can refer you to this tutorial because it´s almost the way I did and I will for sure try this very soon. You´ll find it on Mushroom Villagers´ blog. […]
Posted by Welcome Interruption « Mushroom Villagers on October 13, 2008 at 2:12 am
[…] The Eddie Cap Tutorial […]
Posted by K on October 18, 2008 at 8:16 pm
I’ve been looking all over for this, finding only knit instructions, so can’t wait to try in soft fabric for “newsboy” caps for my toddler granddaughters. They want ones like their teen cousins wear backwards!
So you might post a photo of a “girlie” one. Would you put in a heavy interfacing for a softer fabric brim and maybe make longer and less deep for girl?
Thanks!
Posted by Jessica Smith on July 28, 2017 at 3:07 pm
I did exactly that, I shortened the brim and used lighter fabric with interfacing. I also used 2 12×12 basted together wrong sides together with interfacing in between the 2 layers so the lining would not show interfacing. Works well. Walking foot would have been useful.
Lighter fabric tends to stretch a little around the brim, you may want to interface both of the lining pieces to help prevent the stretch.
Posted by Nath on October 19, 2008 at 5:47 am
Bonjour, Super contente d’avoir trouvé (grâce à ma soeur) ce tutoriel que je vais m’empresser de faire pour ma fille aînée !
A bientôt et merci
Hello, very happy to find this tutorial. I will do a cap to my first girl !
See you soon and thanks
Posted by Crafty Christmas Boy Style….. « See Mommy Sew on November 2, 2008 at 4:26 pm
[…] – Eddie Cap […]
Posted by Feb28.com » Christmas Crafting Part II on November 4, 2008 at 6:48 pm
[…] Cool Hat […]
Posted by breah on November 5, 2008 at 3:25 am
that is so cool can you tell me wear you got the ideal from
Posted by 17+ Boys Clothes Tutorials! « Everything Your Mama Made & More on December 4, 2008 at 8:24 pm
[…] Eddie Cap […]
Posted by meg on December 18, 2008 at 6:09 pm
OMG your brilliant!! i would NEVER have guessed you were a new sewer from this tutorial. its perfect and i really thought it was well explained. (i have added a link to it on my own site (imadeitshop.wordpress.com)
Posted by Megan on February 2, 2009 at 3:52 pm
Thanks so much for this pattern! I made one this morning out of wool felt. There’s a pic posted on my blog in this post: http://tribalmeg.blogspot.com/2009/02/ladies-especially-steamy-ones-wear-hats.html
Posted by Sew,Mama,Sew! Blog » » February 21 ~ FQ Project of the Day on February 21, 2009 at 5:22 pm
[…] by Irene, Mushroom Villagers You might need slightly more than a fat quarter for Irene’s Eddie Cap Tutorial, but we think it’s a perfect, small project with great results. You can also make very cute […]
Posted by Missy on February 22, 2009 at 4:16 am
So dang cute! I’m going to have to try this! Thanks for sharing.
Posted by Natalie on February 22, 2009 at 6:16 pm
I love this hat!!! It looks super cute and fairly easy to make. I will be getting some supplies this week to get it done. I thought your tutorial was great! and the pictures really help to explain what needs to be done.
Posted by Elizabeth on February 23, 2009 at 9:05 pm
Just wanted to thank you for the very clearly written and demonstrated tutorial. I made the hat, and it turned out great. Even the tricky parts were so well explained that it made the project easy.
Blessings~
Posted by Tutorial: Sew a boys’ cap · Sewing @ CraftGossip on February 23, 2009 at 10:29 pm
[…] is one such project. I love it in wool! What little guy wouldn’t be proud to wear one? Get the tutorial and make one for the little man in your […]
Posted by sewing spring in the middle of a snowstorm at Crazy For Trying on March 3, 2009 at 2:56 am
[…] The Eddie Cap […]
Posted by Carolina on March 5, 2009 at 2:54 pm
¡¡Oh!! It is wonderful!! Thank you very much. Hugs from Spain.
Posted by turkish delight on March 7, 2009 at 4:40 pm
it is wonderful!!!!!!!! I am from TURKEY.I am turkish
Posted by Heather on March 18, 2009 at 7:19 am
This is such a cute hat. It’s going right to the top of my list of projects!
Posted by Sue on March 26, 2009 at 2:50 am
I finally made this, have wanted to for such a long time. Thank you for the great tutorial, I used old jeans to make mine and it came out adorable. I will post a picture just as soon as I can get it on my grandson’s head. Now I want to make another one!
Posted by robyn on April 13, 2009 at 6:46 pm
Thank you for this tutorial. I just made it for a friend’s son and am really pleased with how it turned out. Now I need to make one for my son. :0)
Posted by Princess_Christmas on May 4, 2009 at 12:18 am
awesome tute, I think my nieces will be getting hats like this as part of their road trip 2010 bags, along with a matching outfit of course:) I see it now, peasant blouse, capri’s and an Eddie hat!
Posted by LindaG on May 7, 2009 at 6:06 pm
Oh, what an awesome tutorial!!! I am a beginning sewer but with your tute I feel confident that I can do this Eddie cap, too; thank you so much!
Posted by tournesol on June 15, 2009 at 11:42 am
Great tutorial, simple and easy to follow, thanks so much! I’ve been wanting for a long time (they seem to be a bit overpriced in the shops up to 75€). I recycled an old pair of jeans for it. It was such a success that I have done another one for my friend and my parents have already put an ‘order’ in to have one too….
Posted by Sewing weekend against frustration « Dots&Yarn on June 22, 2009 at 8:54 pm
[…] given her sewing machine, we have slowly gotten back into it. I have found a great pattern for a cap – perfect with tutorial and pictures to show less experienced (or slighty brain fogged people […]
Posted by El Conductor on July 7, 2009 at 2:50 pm
I sew mostly costume-level outfits and needed an engineer’s hat to complete my “El Conductor” outfit. (I support our city’s semi-pro soccer team by attending matches in costume). Thank you for the easy-to-follow instructional.
Posted by All4PAWS on August 1, 2009 at 11:06 pm
Thank you for this GREAT web page, my son is having his 5th birthday in December and this should be quick to put together for his party which we are having at a ride on scale model train park. I’m going to make one for all his friends invited too.
THANK YOU from Australia
Posted by Kim on August 10, 2009 at 2:11 pm
Hi!
I love this hat! My little boy would be SOOOO cute in it with this little curls sticking out. Any suggestions on how to adapt the pattern to fit a 3-6 month old? Any helps will be great. Thanks:)
Posted by mitchell on August 10, 2009 at 9:20 pm
could you make a tutorial for the original newsboy cap?
i’ve searched all over for patterns but couldn’t find any.
Posted by julie on September 26, 2009 at 9:16 pm
I have been looking on-line for a hat like this to sew. Thank you so much! It’s perfect. And Eddie is just too adorable for words 🙂 I have three boys of my own, so I can definitely use this pattern for them and my unusually small head. lol
Posted by Andrea on October 3, 2009 at 12:19 am
Super, I have been looking for a hat pattern like this one. Great tutorial. Thanks!!!!
Posted by LillySmuul on October 8, 2009 at 6:05 pm
Exactly what I was looking for!
Thanks for tutorial!!!!!
Posted by Amber on October 8, 2009 at 11:12 pm
TOO CUTE!!!! This is the most detailed, yet simple tutorial I have seen to make a hat like this one. I want to make one in pink for my almost-4-year-old girl who keeps cutting her hair!
Posted by noolygirl on October 17, 2009 at 5:11 am
Hi! I love this cap!
I want to make one for my daughter, but her head is only 19″… how do I adjust the sizes?
Thanks,
Yael
Posted by Bridget on November 3, 2009 at 2:47 am
This cap made my son’s Halloween costume! He loves it and hasn’t taken it off since. 🙂 Thanks for the clear instructions and very helpful photos!
Posted by lenetta on November 16, 2009 at 3:32 am
I have a nephew who would really rock one of these! Great job! I linked to this on my weekly roundup – post is here. Thanks!!
Posted by Sarah Miller on November 24, 2009 at 1:49 pm
I made this hat for every boy in our extended family (and my daughter too) two years ago at Christmas. I think we are revisiting this little cap this year as more kids have been added! Thanks again for a fabulous tutorial!
Posted by Natalie on November 30, 2009 at 12:59 am
Hello! I just wanted to tell you how thankful I am for sharing this tutorial! My son’s love trains and love their train hats! They were so excited to have a train hat that Mommy made! And because it is made of wool they are perfect for the winter! I was wondering if you would suggest how to make one bigger for an adult (me and my husband want one too!) and how to make it much smaller for a 1 year old. Thanks again!!!!!!
Posted by Irene on November 30, 2009 at 8:01 am
I’ve made this cap for adults as well. The only adjustment I make is in the band size which I simply make bigger. Then to get the top of the cap to fit, I don’t pleat it so much. It takes a little longer and you may to do some trial and error, but overall, it’s a easy adjustment. Most adult heads are not more than 1 or 2 inches larger.
Now for a one year old, you may not be able to pleat it enough to get the top to fit into the correct size band for a 1 year old. I’ve never tried to shrink it a ton, but I’m thinking you’re going to have to make the octagon smaller… maybe going in 4″ instead of 3.5″. I really don’t know if that would work though. If you do try it, please let me know how it worked out.
Thanks for the nice comment. I’m glad my tutorial worked out for you!
Posted by dewy dasies on September 29, 2010 at 1:55 pm
Irene,
I did make one for a one-year old, and using a smaller octagon did the trick. Her head measurement is about 17 inches, so my band measurement was 19, and the octagon originated from a 10-1/2 inch square instead of 12, and I measured in 3 instead of 3 -1/2 for the corner cut-offs. This all allowed room to ease/adjust. I also adjusted the size of the bill down some to keep things proportional. Let me know if you have any more questions!
Posted by Irene on October 14, 2010 at 8:32 am
Thanks for sharing your adjustments! I’m sure others will find it so helpful.
Take care,
Irene
Posted by Wendy on December 2, 2009 at 1:23 pm
Wow, great hat – I can’t wait to see if my sewing will stretch this far. I do plan making a couple for my 2 and 4 year old boys.
Posted by Ruth on December 5, 2009 at 8:49 pm
thank you so much!! this ADORABLE conductor hat turned out perfectly–made out of my old striped curtains–my nephew (who is getting a train set for christmas) is going to LOVE IT!!!
Posted by 20+ Boys Clothes Tutorials! « Everything Your Mama Made & More on December 5, 2009 at 9:13 pm
[…] Eddie Cap […]
Posted by Cariann on December 10, 2009 at 12:24 am
This is so cute… I have 2 boys and think we will be making a couple of these hats… might even try making one for Mommy too…
Posted by the life pursuit - little girls’ aprons on December 12, 2009 at 10:35 pm
[…] Joanne Fabrics had NO heavier cotton, canvas or denim in blue and white stripes for me to make Jack this hat. He has been pretending to put on a conductor’s hat when he drives the […]
Posted by Leta Smith- Stitches of Faith Embroidery on August 22, 2013 at 3:34 am
Did you look for pillow ticking? That ought to work. You may need to iron-on some fusible interfacing on the octagon itself and the band.
Posted by claire on December 21, 2009 at 1:45 am
this was so helpful! I made one for a friend for Christmas. and your son is adorable.
Posted by Hattar till barn – Tails and yarn on January 1, 2010 at 11:14 am
[…] Gubbkeps […]
Posted by Free Hat Patterns on January 16, 2010 at 5:57 pm
[…] Eddie Cap […]
Posted by Joye on January 20, 2010 at 5:04 am
Wow! You are my hero! I can’t wait to try this!!
Posted by Christie H. on February 5, 2010 at 5:43 pm
Just stopping by to say how awesome this hat is! I looked at all the photos on Made by Rae’s site, and yours is my fave! Thanks for the great tutorial!! LOVE IT!
Posted by Irene on February 6, 2010 at 7:13 am
Thank you!
Posted by Becca B on February 17, 2010 at 8:55 am
I’m planning on making this for myself and putting some ruffles around inside of the brim…can’t wait! Great tutorial! Love it!
Posted by Eddie Cap Sewing Tutorial on February 24, 2010 at 4:47 am
[…] What: The Eddie Cap Tutorial […]
Posted by Patterns I owe for » My Passions My Creations & My Life on March 10, 2010 at 8:47 pm
[…] Here are few things I made with the help of my favorite ones.. 1. Eddie Cap This is from the site mushroom villagers. I made a small change in the pattern. Instead of making the main cover to octagon, I made it to a […]
Posted by Eddies Cap (engl.) | ♥ Bloggarten ♥ - Freebies on March 21, 2010 at 10:46 am
[…] Date : März 21st, 2010Category : KopfbedeckungenAuthor : AnnaNo comments ein Cap im Bäckersjungenstil: mushroomvillagers.wordpress.com […]
Posted by ianrad on April 2, 2010 at 5:31 pm
GREEEAT TUTORIAL. THIS IS WHAT I WAS LOOKING FOR tanks allot
Posted by Annelyse on May 26, 2010 at 7:07 pm
I adore this. The nicest cap tutorial on the net. I made it for my son (in a sheap fabric for exercising) and my husband asked to make him also one.
Posted by Linda Lee on June 9, 2010 at 7:50 pm
Wonderful Tutorial!
If you use striped blue denim it will be a Train Conductor’s hat. I made them when my sons were little and into trains.
Posted by Niet mooi | Annelyse on July 1, 2010 at 8:35 pm
[…] Liv werd het ook de Eddie Cap (mijne favoriet) en dan maakte ik nog een rokje, weer de market skirt maar terug zonder zakjes […]
Posted by tutujoli on July 13, 2010 at 8:13 am
Thanks so much for sharing your tutorial! I’ve linked to it in my blog, tutujoli.blogspot.com. 🙂
Posted by Eddie Cap « Life as Saar on July 21, 2010 at 11:25 am
[…] De tutorial: klik. […]
Posted by Found on the Web: Stylish & fun boys clothes sewing tutorials « Murray the Monster on July 30, 2010 at 8:54 pm
[…] be completely economical, I’ll be re purposing an old pair of wool pants as the fabric. Click HERE to view the complete […]
Posted by Clothes from Curtains « Music Maiden on August 4, 2010 at 3:35 am
[…] I’ve had the tutorial for the Eddie Cap bookmarked for quite a while, so Friday night I set to work. By Sunday afternoon, I had two hats, […]
Posted by Extra! Extra! « MacAimee on August 26, 2010 at 1:59 pm
[…] really, REALLY want to make one of these, but Quin has informed me she doesn’t want a hat. But I think I’m making one today […]
Posted by kids clothes week challenge « Domestic Wormhole on September 15, 2010 at 12:24 am
[…] to make a hat, I think the type I have in mind is called a newsboy or pageboy hat (?), sort of like this one. I’ve seen some very cute girl versions done up in brown corduroy, though Pia has informed me […]
Posted by kcwc: day 1, this time for real « Domestic Wormhole on September 20, 2010 at 10:14 pm
[…] Pia was at school I set my mind to sewing an Eddie Cap for her. I can’t say enough good things about this tutorial. First, I am amazed at how Irene […]
Posted by Courtney on September 20, 2010 at 10:23 pm
Just made the eddie cap today and wanted to let you know how FABULOUS your tutorial is! Awesome job, and thanks for sharing 🙂
Posted by Irene on October 14, 2010 at 8:34 am
You are welcome! Thanks for the sweet comment. It made my day. 🙂
Posted by dewy dasies on September 29, 2010 at 1:46 pm
I gotta say, this struck my fancy the minute my eyes rested on it! I’ve now made three little caps for my granddaughters, using two coordinating corduroy’s with fusible interfacing sandwiched between for adequate stability, and being careful on the inside band seam, have the most adorable reversible hats for the girls! On the smallest, I also added a small piece of 5/8″ elastic inside the back of the band for snugger fit. They love them!
Posted by Naomi Best on October 8, 2010 at 7:47 pm
Hello,
I’m from Cape Breton Island, Nova Scotia, Canada. I made your Eddie cap for my son on his first birthday. I got so many complements on it. I understand that this pattern is for personal use only. However, I was wondering if you would sell a copyright for it or give me permission to make and sell them locally.
I would appreciate if you could get back to me.
Thank you,
Naomi
Posted by Andrea Fikkert on October 22, 2010 at 9:28 pm
You are a LIFE SAVER! We have family pictures on Sunday and I’m scrambling to get everyone coordinated and this might just save the day. Thank you SO much!
Posted by Ilse on November 9, 2010 at 1:25 am
A big THANK YOU from Berlin, Germany for this tutorial!
liebe Grüße
Ilse
Posted by Stephanie on December 10, 2010 at 7:57 pm
Hello! I am a 1st-4th grade teacher and am putting on a play of Christmas Carol and used this design for the paupers! I used felt and hot glue and it came out just the same! I have a feeling I will be reusing these hats for everything!
Thanks for the clear tutorial!
Posted by Jessie Adams on December 12, 2010 at 2:40 am
Hi, thanks so much for sharing! This hat is so great, and your tutorial is so thorough and easy to follow!!
Posted by Sylvia on January 2, 2011 at 3:22 pm
I wish you a very happy New Year from Germany (Hamburg) and I love your great Tutorial. Thank you so much.
Posted by tanya on January 15, 2011 at 7:04 am
thank you for the tutorial. way cute….next time i make it though, im gonna shorten the brim. otherwise fantastic.
a big thank you from british columbia, canada
Posted by joyce r on January 28, 2011 at 10:10 pm
I was attaching the band to the brim and had some trouble matching up without some puckers, is there a way around this. Other then that, love the project and your instructions are great!
Posted by Irene on February 18, 2011 at 5:52 pm
Hi Joyce,
Sorry to hear about the puckers. Puckers are pests! Anyway, I found that if I pin alot or use a walking foot, I can almost always be pucker-free! Also, make sure your seam allowances are the same. Hope it works out and thanks for stopping by!
Take care,
Irene
Posted by Yina on February 22, 2011 at 10:34 pm
Thank you very much for this tutorial, i need a luigi’s hat and i think that this is great for it =)
God Bless you all !!!!
hugs from Venezuela
Posted by milene-micoton on February 26, 2011 at 1:57 pm
Je m’en vais l’essayer d’ici peu … dès que j’ai un peu de temps libre. Le tuto à l’air facile à suivre .
Merci !
Posted by Shantel on February 26, 2011 at 3:37 pm
I features these caps on my blog!
seemesew.blogspot.com
Posted by cecelia on March 8, 2011 at 6:26 pm
Thank You! I am making this for my son to wear with a costume! It will work perfect.
Posted by Stephanie on March 25, 2011 at 2:33 am
Hey, thanks for the excellent tutorial… I was able to make a cap for my son who needs a hat to wear on the stage…
Posted by Creating for the Easter Hat Parade « Created Today on April 14, 2011 at 4:12 am
[…] bunny ears protruding from the band. So, using the amazing tutorial for the Eddie Cap on Mushroom Villages, I made […]
Posted by Kyla on April 15, 2011 at 5:44 am
While I was looking for something else, I happened across your tutorial. Lucky me! What an adorable hat. I can’t wait to try to make one for my son! Thanks so much for posting this tutorial. ~Kyla from Vancouver, BC, Canada.
Posted by Sewzanne on May 13, 2011 at 6:56 pm
Thanks so much for the tutorial. I just linked to this post on Facebook
Posted by To Do List « Crafty Upcycled Fun on May 17, 2011 at 9:12 am
[…] Eddie cap […]
Posted by Lorraine on May 29, 2011 at 9:46 pm
I have been sewing for some time but still consider myself a learner. I would not have tried this pattern before but now am confident that I could have a go at it. I have two grandsons that would love this cap. Thank you for such simple instructions.
Happy sewing.
Lorraine
Posted by Tommy on June 23, 2011 at 10:18 pm
HaHa, love the cap and want one for myself! I am not sure about the patterns out there for caps but there are a lot of steps involved. I would say yours are sensible and easy to understand and follow. Pictures are the best way to describe it. Thanks
Posted by Melissa Jensen-Morgan on July 3, 2011 at 11:43 pm
Would love to know, what is the circumference of this hat? I’m not shy about trying to modify patterns, but it helps to know the starting point without having to waste time making and measuring the original first, when that’s not what I actually want to make. Thanks for the inspiration, if nothing else!
Posted by Melissa Jensen-Morgan on July 3, 2011 at 11:53 pm
nevermind 😉 oops!
Posted by Mommyof2babies on July 25, 2011 at 3:56 pm
Do you have a way we can buy this tutorial for selling rights? I make little girl stuff, but I have recently had alot fo requests to make little boy items and this is cutest hat ever. I am a stay at home Mommy and I usually only sell a few items per month so it would be small scale sales. Please let me know b/c I really LOVE this hat!
Posted by Mark Bittler on July 31, 2011 at 11:17 am
Nice Cap i like it and a great Tut
Posted by Sewing Tutorials - Eddie Cap from Mushroom Villagers | Sewing Tutorials Library on August 3, 2011 at 4:56 pm
[…] The Eddie Cap Tutorial from Mushroom Villagers […]
Posted by jean filkin on September 1, 2011 at 1:21 pm
Great tutorial, I can’t wait to one for evey one of my grandchildren. I buy old wool jackets and skirt from a re=sell shop for other projects…now I will have to save some for this project.Thanks again
Posted by Linda on September 1, 2011 at 5:53 pm
The cap is really cute. But that baby is gorgeous! Thanks for the tut…
Posted by Jenny on September 20, 2011 at 8:38 am
Hi there, I just made a hat for my little boy using your great tutorial. Mine definitely doesn’t look anywhere as good as yours but I’m still happy with the result for a first try. (Somehow my front pleats got a bit swallowed up by the band?) – You probably wouldn’t know to look at it (without comparison to your awesome original that is!)
Check it out here : http://mendandmakenew.blogspot.com/2011/09/dear-hat-for-sweet-boy.html
Thanks again for a great tutorial.
Jenny (New Zealand) 🙂
Posted by Stupendous Joy on October 12, 2011 at 3:01 am
What a gorgeous cap. I can’t wait to give this a try. Thank you for sharing. 🙂
Posted by SH on October 19, 2011 at 9:34 am
hi
i am Shaima from palestine
this is an amazing tutoial .. i followed your instructions & made a beautiful hat for my little boy from Denim!!
It came out very beautiful .. but the bill was too long & flobby .. but i managed to adjust it.. so next time im going to make the bill too much shorter
thanx for the great tutoial.
Posted by Heather on November 9, 2011 at 6:04 pm
Loved this tutorial! Can’t wait to try this with a felted sweater that I am going to recycle. Thank you so much for all the time and effort you put into sharing this.
Posted by quitereasonable on December 3, 2011 at 4:10 am
This is a great tutorial. I made your hat twice and linked to your tutorial on my blog along with my adjustments (http://quitereasonable.blogspot.com/2011/12/2nd-eddie-cap.html). Thanks so much.
Posted by alisha on December 6, 2011 at 4:16 am
just made two of the hats for my 5 year old twin boys. i made them out of a thrifted pair of jeans that are blue and white pin striped so they are little conductor hats. thank you so much for the tutorial! we are doing a handmade birthday and christmas this year to keep cost down and it has proven to be such a wonderful experience! merry christmas 🙂
Posted by Heike on February 5, 2012 at 1:44 pm
Hallo
ich habe die Mütze zum erste mal versucht, ist am Ende etwas zu klein geworden, ich komme mit den Zeichen [ ” ] nicht klar habe mich nach Bildern von dir orientiert.
Vom lesen her verstehe ich es nicht, finde diese Mütze ganz toll, sie funktioniert bei uns in einem Theaterstück von 1929.
LG Heike
Posted by Monkey Business « The Nesting Spot on February 22, 2012 at 5:11 am
[…] made a monkey in a long time. It was a fun challenge to make his little hat too. I found this tutorial online to help me picture how to sew it and then I adapted it to fit a monkey. Share this:Like this:LikeBe […]
Posted by El Taller de Bielisa » Gorra para niño on April 13, 2012 at 12:08 pm
[…] Gorra para niño Posted in Blogs interesantes, General, Otras labores, Tutoriales 13/04/12 Esta gorra se ve super chula y además se puede hacer en cualquier tamaño ahora están muy de moda, perfectas para este verano!! Mushrooms Villagers […]
Posted by Baby Boy Gift Ideas on April 14, 2012 at 11:57 pm
[…] the Eddie cap for a little boy. It’s very […]
Posted by Melissa on April 22, 2012 at 11:57 pm
Love, love, love this!! Your Eddie looks so handsome and I bet my Frankie will too in this cute cap! Any ideas for making a little guys cabbie hat?
Posted by Jos K (New Zealand) on April 23, 2012 at 10:27 am
Thank you for posting your ‘Eddie’ Hat. I am goingto make this for me tommorrow, from Polar fleece. I can make suits and other clothing, however Hats are new to me. I must also say I am totally impressed with you hat and that you say you are new to sewing. Many thanks for the posting
Posted by looky a cap! | WHIMSY LOFT on June 1, 2012 at 12:06 pm
[…] it’s made from this tutorial. THANK YOU Eddie’s Mommy for this […]
Posted by ~*jane*~ on June 16, 2012 at 8:15 pm
It’s been four years since I first saw this tutorial and I’m still using it! Thanks so much for an awesome cap and tutorial… Can’t believe you cooked this up when you still considered yourself a “beginner”. Posted a link to your tute here: http://makejanemake.blogspot.ca/2012/06/great-hat-eddie-cap-from-mushroom.html
Posted by Kathy Vruwink on June 19, 2012 at 8:50 pm
Our county fair has an restored country school on the grounds. We plan to have bonnets for the girls and caps for the boys to wear while visiting. This will be perfect for the boys. I had been thinking of straw hats, but think this is probably more authentic.
Thanks!
Posted by Tons of Tutes- Kids Clothing & Accessories on July 1, 2012 at 1:57 am
[…] Eddie Cap […]
Posted by Judy on July 24, 2012 at 10:34 pm
Where can I find patterns for this hat and others such as newspaper boy, Ivy league, driving cap, Gatsby flat cap, golfer cap and the list goes on. I have been searching the internet and all I am finding is ready made hats not patterns even when I googled for patterns.
Posted by posted by Carolyn on August 242012 3;30 pm on August 24, 2012 at 7:41 pm
This hat is adorable! I will make it for my grandson, thanks for sharing.
Posted by lunatix on August 28, 2012 at 8:31 pm
hi, just wanted to say, i really love your tutorial!
it’s so very easy and looks great!
i made a cap for my nephew’s birthday a while back and he loved it. now my niece got one for herself. and my sister seems to be next ^_^/
good luck for future projects!
http://lunatixneedlework.blogspot.de/2012/07/geburtstag-vom-mini-monster.html
http://lunatixneedlework.blogspot.de/2012/08/geburtstag-so-gro.html
Posted by melanie on September 25, 2012 at 2:16 am
Thank you for sharing. I got some fabric to make a hat for my son, and have been eagerly waiting to find some instructions. I hope to start as soon as I can measure his head!
Posted by Sylvia on October 11, 2012 at 11:20 pm
Very cool hat! Just made it and instructions are perfect!
Posted by Michelle on October 19, 2012 at 3:10 am
Thanks so much for the great pattern! This is a really great tutorial and great pictures!
Thanks!
Posted by Michelle on October 19, 2012 at 3:13 am
Forgot to say in my previous post that I modified it and made my Grand Daughter a Strawberry Shortcake hat for her Halloween Costume. I just made the brim shorter! It turned out really cute!
Posted by Natalie Horton on October 20, 2012 at 8:30 pm
Just found this and made it!! In an afternoon!!! Great tutorial and loved the finished project. I made mine orange with a black pumpkin face on it for my boy! Great photo prop for us at the pumpkin patch!!
Posted by Sylvia on October 27, 2012 at 12:01 am
Made the second one! How many g’sons do I have??
Posted by PapaDoc on November 8, 2012 at 9:24 pm
How ironic that I found this pattern for a cap. I have been desperately searching the internet for a pattern and I found you. I will be making this very soon. Thank You!
Posted by Kendra Pendolino on November 25, 2012 at 6:26 pm
I made this one out of red felt and stitched on a red M on a white circle to make a Mario hat for a halloween costume. It came out wonderfully!
Posted by Lisa on January 5, 2013 at 4:44 pm
This is so cute – may have to make a summer weight one as too hot in New Zealand for wool at the moment!
Posted by gloria on January 9, 2013 at 3:30 pm
Wonderful tutorial!! I’m sending several of these off to college with my middle daughter in the fall…she LOVES them!! THANKS!
Posted by Toby Crane on January 28, 2013 at 11:52 pm
Thanks for sharing this information. I appreciate for the square caps that are found here. I have seen some major differences.
Posted by ann taylor loft coupons codes on January 31, 2013 at 3:05 pm
In recent months, Lindsay has enough to worry about in her life.
Amongst her claims are that Lohan would be appropriate to make an impression.
Posted by Cassadie on February 5, 2013 at 5:27 am
Thank you, thank you, THANK YOU for this tutorial. I have made the Eddie Cap many times and it’s always a hit. Here’s my latest
http://www.redscreendoor.blogspot.com/2013/02/pizza-for-5-and-pop-music-for-all.html
And one from awhile ago http://redscreendoor.blogspot.com/2010/11/waiting-for-snow.html
Posted by Meg on February 10, 2013 at 3:32 pm
Excellent tutorial. How should I modify the octagon size for an infant cap?
Posted by Juliana on February 25, 2013 at 6:28 am
I actually desired to share this unique blog, “The Eddie Cap Tutorial
| Mushroom Villagers” together with my best close friends on facebook or twitter.
I actuallyjust simply needed to distributed your terrific writing!
Regards, Bernd
Posted by seedybeans on February 28, 2013 at 4:13 pm
Just had to tell you I love this pattern/hat. I have made 2 now for my little guy and love how easy to follow it is. I volunteer at a teen parent center and plan to use it to teach the girls how to make them for their little ones out of old flannel shirts. I will credit you and post pictures on my blog. Just wanted to say thank you thank you!!
Posted by weaving, hats and a bit of bother with braille | itiseasytobegreen on March 9, 2013 at 10:42 pm
[…] as just look a bit bobbly! Researching for the same piece led me to this fantastic hat pattern https://mushroomvillagers.wordpress.com/the-eddie-cap-tutorial/ which i may adapt and […]
Posted by Keeping It Real! on March 25, 2013 at 3:55 am
Thank you so very much, this is a wonderful and well written tutorial, I plan to make lots of these for my friends, we run a kitty rescue train nation wide, and have conductors across the USA I think this with a kitty cat or paws fabric will be so awesome!!! 🙂 THANK YOU!
Posted by Muse of the Morning • 19 Easter Outfit Inspirations & Tutorials For BOYS! on March 28, 2013 at 2:20 am
[…] may be where it’s at for making super adorable boy’s clothing! This hat is called the Eddie hat and it would look so sweet on a little guy’s head! (From Mushroom […]
Posted by Paper boy cap | icanmakeitmyself on April 25, 2013 at 4:30 pm
[…] href=”http://icanmakeitmyself.files.wordpress.com/2013/04/20121231_145446.jpg”> This is a cap I made for Brendan for a photo shoot. I decided not to make a tutorial for this because the one I used is pretty straight forward. So here it is https://mushroomvillagers.wordpress.com/the-eddie-cap-tutorial/”></a><a […]
Posted by elena on July 15, 2013 at 11:32 am
what a wonderful cap. It’s so stylish. Thank you so much for sharing your tutorial :). Regards from barcelona
Posted by summer staples: hats | kids clothes week blog - kids clothes week blog on August 18, 2013 at 6:52 pm
[…] just finished a game of chess in the park. this pattern covers ages 6 months – 10 years. 4. eddie cap (also with tutorial!) by irene over at mushroom villagers. irene made it for her 4-6 year old son, […]
Posted by Gigi’s hats | Seeds & Stones on September 14, 2013 at 10:17 pm
[…] in front of the sewing machine on this rainy Saturday morning I set to making the 4th ‘Eddie Cap‘ for Jaengy. So many people have asked me about this hat I swear I could have sold 100 […]
Posted by Friday Favorites–Hats Off to You | Crafty Staci on September 27, 2013 at 1:01 pm
[…] Any little guy would look good and stay warm in this Eddie Cap from Mushroom Villagers. […]
Posted by Lis on October 7, 2013 at 10:14 pm
I’m a very beginning sewer and I get lost when you start doing the bands part. Is there any chance that you have or will have a video tutorial for this? Thank you!
Posted by Barbara Lowell on October 9, 2013 at 12:17 pm
Love it … I have 12 grandsons … will surely try it…..
Posted by Andi J. on October 9, 2013 at 3:42 pm
This is awesome! I am a private tutor and one of the subjects I teach is needle crafts. I have a little boy in one of my sewing classes that I struggle to find “boy things”, as he calls it, for him to do. His parents bring his two sisters over to learn crochet and he came with them the first day. I asked him if he wanted to learn to crochet too and he vigorously shook his head no.
He left with his father. When they came back I asked him if he would like to do anything while his sisters were here next time. My sewing machine was set up because I was working on a quilt. He looked over to it and said that he would like to learn to sew.
The next time they came over he was so excited. Back in my fabric stash, I had a pillow panel with an eagle in flight on it. I thought that would be the perfect first project for a little boy so while his sisters were busy on the project they were working on, I got him started learning how to cut out the panel and then we worked on controlling the machine. (I have a teaching machine and can governor it down to a very slow stitch so it cannot get away from beginners. As they progress, I loosen up the pedal so they have to use their foot to control the speed but it is perfect for my beginning students.)
He was able to finish his pillow and stuff it and take it home with him that day. We have made other “boy things” over the months, and I think he is ready to progress to something a little more difficult and this is the perfect “boy thing” for him. I cannot wait to tell him what we are making next. 🙂 By the way, I made a PDF out of your instructions so I have them for future reference because I have a feeling when the other boys see this, we will be making several of them. If you would like the PDF to add to your blog, let me know and I will send it to you.
Thanks again!
Blessings,
Andi J.
Posted by Irene on February 23, 2014 at 3:05 am
Thank you for your offer Andi. I would love to add the PDF to my blog! I’m so happy to hear about your boys and teaching. Thank you so much for sharing.
Posted by Courtney on October 31, 2013 at 6:49 am
Plan on trying this in the morning, as I am wanting to make one of my twin boys a train conductor for Halloween. This was sort of a last minute thought and I didn’t want to spend the day out looking for a child’s conductor hat. Plus, I have tons of scrap fabric I need to use anyway. LOL! Wish me luck.
Posted by Abbi on November 4, 2013 at 3:17 am
I just made one out of blue and white striped fabric for my train loving nephew. He really liked it.
Posted by joan newton on November 8, 2013 at 4:48 am
Great design. Making one for my 27 year old daughter for the winter. She usually hates hats but loves this one!
Posted by طريقة عمل قبعه لطيفة ^_^ | خياط هندي on December 16, 2013 at 2:04 pm
[…] استمتعوا ♣ […]
Posted by Betty on December 23, 2013 at 5:20 pm
Is thre a way to print out the tutorial? My computer is in one room and my sewing in another. Thanks
Posted by susan hatch on December 23, 2013 at 5:37 pm
so glad this was offered again. I just now saw it. So…could I make this for my husband who loves all kinds of hats? And how much larger would the hat part have to be? I’ve figured out the band issue, I think. Your work is extraordinary for a beginner. Hope you designe more.
Posted by Elizabeth Carney on December 23, 2013 at 6:57 pm
I think I just found the courage to attempt making a hat for my grandson! Thanks so much for such a clear tutorial; both pictures and instructions.
Posted by Debra on January 18, 2014 at 2:32 am
Very adorable – can’t wait to make it for my grandson – thank you for sharing😊
Posted by Top 10 Lovely DIY Sewn Winter Hats on January 21, 2014 at 9:31 am
[…] DIY project and photo credit to mushroomvillagers.wordpress.com […]
Posted by Jo-Anne on January 24, 2014 at 10:03 pm
Thank you for a great tutorial. Exactly what I have been looking for. It is now number one on my ‘to sew’ list.
Posted by Project Costume Finished! - Sewplicity on February 10, 2014 at 3:02 pm
[…] the Eddie Cap tutorial from Mushroom Villagers I used the Apt. 90 tutorial for the top of the cap, but I wasn’t crazy about the way the […]
Posted by What to do with the Jeans??? UPCYCLE! - Sewplicity on February 10, 2014 at 3:08 pm
[…] Since she has no use for an electronic case, I thought I would take the opportunity to try out this Eddie Cap tutorial by Mushroom Villagers. This hat took under an hour to make and the tutorial was quite easy to […]
Posted by 2011 - What's On Your List? - Sewplicity on February 23, 2014 at 3:11 am
[…] there is this Eddie Cap by Mushroom Villagers My kids (and myself) would just love to don it around […]
Posted by JadeEmpress on February 25, 2014 at 10:35 pm
I loved this soooooo much I couldn’t resist making two for my boys. Jayson; 2 and a half years old with head circumference of 20 and Jeremy; 4 months old with circumference of 18. LOL. They’re asleep now. Would take pics of them modeling the Eddie caps 2morrow.
Posted by Betty on March 17, 2014 at 6:36 pm
Want to make this for my niece who is starting chemo. Is it possible to do a print out of the instructions?
Posted by Jane kaufman on March 26, 2014 at 7:11 pm
Beautiful gray color! I could just hug your little boy! You should consider selling these at flea markets!! You would make a fortune! I’m a grandmother of three and a great-grandmother of one (boy)! I will send him an “Eddie Cap”, (he is two), so he can enjoy it too! The young man in your tutorial is precious. Thank you for sharing your pattern! I too will have to buy the gray wool! Jane in Georgia.
Posted by A Look Back: On Track Fabrics - THE RAMONS on April 13, 2014 at 5:58 am
[…] Eddie Cap Tutorial by Mushroom […]
Posted by Hat for Preemie Boy | Deb's Dress Project on April 28, 2014 at 3:10 am
[…] https://mushroomvillagers.wordpress.com/the-eddie-cap-tutorial/ […]
Posted by Jo Rich on July 7, 2014 at 9:50 pm
Thank you, you have really helped me out! My daughter has to dress as a Victorian at school tomorrow & wanted to go as a chimney sweep with a waistcoats & cap! I’ve managed to make both tonight in a deep blue felt! Hooray! Let’s hope the hat fits!! Your tutorial is very clear. Many thanks. I think I’m going to be making more of these….
Posted by Tons of Tutes- Kids Clothing & Accessories | My great WordPress blog on August 13, 2014 at 6:39 pm
[…] Eddie Cap […]
Posted by Reishi Ganoderma Lucidum Side Effects | reishi mushroom supplements on August 14, 2014 at 1:45 pm
[…] herbs with important nutrients. As the mushrooms grow they integrate the powerful benefits from these herbs and nutrients which are expressly intended to heighten the potency of the mushrooms advance their nutritional […]
Posted by 12 Fall Sewing Tutorials {DIY Genius} - EverythingEtsy.com on September 2, 2014 at 4:39 pm
[…] The Eddie Cap Tutorial – Mushroom Villagers […]
Posted by Kathy W on October 12, 2014 at 12:32 pm
Thanks for the great instructions on making the pattern and sewing the “Eddy” hat … My granddaughter was fighting the sun in her eyes while riding in her car seat ( the car visors are no help ) so I was thinking I need to find a hat pattern with a bill to shade her eyes … Your pattern and instructions seem easy enough to follow so I’m going to give it a try and use some fabric from old jeans I have around … Thanks so much I’m just a basic sewer so this is very much appriciated 🙂
Posted by Lynne on November 7, 2014 at 3:34 pm
Very well written! Thank you for that. I can’t wait to make it for my grandson. I sew for my granddaughter all the time but it’s hard to find cute items for boys. Thanks again!
Posted by Orlando Newsboy Hat Crochet Pattern Free Online | Home on November 25, 2014 at 1:56 pm
[…] The Eddie Cap Tutorial | Mushroom Villagers – The other reason was that I actually had no clue how to sew a cap!! I actually wanted to describe here how I ended up doing it BUT today I googled for “tutorial cap …… […]
Posted by Philadelphia Newsboy Cap Pattern Sewing | on November 26, 2014 at 2:42 pm
[…] The Eddie Cap Tutorial | Mushroom Villagers – The other reason was that I actually had no clue how to sew a cap!! I actually wanted to describe here how I ended up doing it BUT today I googled for “tutorial cap …… […]
Posted by jackie on January 31, 2015 at 9:50 pm
I made a matching set for my son and me. http://www.bornimaginative.com/2014/12/mama-made-matching-upcycled-wool-caps.html
Thank you!
Posted by Jaime on May 2, 2015 at 12:20 pm
This tutorial was just what I needed. I made this hat from a folded up piece of brown heavy spandex material. It took me two hours start to finish. And I love it! This hat is for a girl dressing as a boy in a ballet production we are putting on tomorrow. It is perfect! I can’t wait to buy some other fabrics and make some more for me and my daughters. Thank you!!
Posted by The "Eddie" Cap | Sewing Shop Blog on November 4, 2015 at 11:07 am
[…] THE EDDIE CAP TUTORIAL […]
Posted by Linda @ Sewing Shop on November 4, 2015 at 1:48 pm
So cute! Thanks for sharing this wonderful tutorial!
I linked to it from my blog: http://www.sewingshop.net/blog/the-eddie-cap/
Posted by Blue Tiger on December 5, 2015 at 7:54 am
hi
im really interested i making one for myself.
But if i make an adult size will it be still 12×12 piece for the crown?
if not, what is your recommended size?
thanks in advance
Posted by Michelmütze für Anfänger | on January 31, 2016 at 11:31 am
[…] solch eine zauberhafte Michelmütze sind, folgt hier mein Tutorial für Euch, welches ich von einer englischsprachigen Website abgekupfert habe. Ich denke mal, nicht jeder hat die Muße sich das Ganze selbst zu übersetzen und […]
Posted by Stephanie on April 30, 2016 at 3:12 pm
Hi Irene,
at first: SORRY for my bad school english – my last english lesson is about 8 years ago…
And then: THANK YOU for the great “eddie cap tutorial”!!
Do you know “Emil of Lonneberga”? I was looking for such a cap, because my son looks a little bit like him. (He even is so cheeky (?)…)
And I found it on your blog, made it in a few hours.
It also will be a part of his outfit on a fifties party in the summer. With some suspenders it will be awesome!!
Greetings from Germany
Stephanie
Posted by Judy P on April 30, 2016 at 6:28 pm
Pinterest is such a great place!! My 6 y/o grandson had just been asking me to make him a hat with a bill! this is perfect. He will love it. Now to find some ticking! (Engineer hat fabric) lol
Posted by November challenge is anything starting with a C - Achelois.co on November 1, 2016 at 8:31 am
[…] Free cap pattern and tutorial at Mushroom Villagers. […]
Posted by Freebook-Sammlung: Mützen und Co. für Kinder und Babies - SewSimple on January 3, 2017 at 6:05 am
[…] Eddie-Cap aus Wollstoff von Mushroom Villagers […]
Posted by December 4 ~ Caps, slippers & a beautiful blanket | Sew Mama Sew on February 9, 2017 at 7:23 pm
[…] Cap By Irene, Mushroom Villagers Have you seen this darling cap? Oh, my! Irene whipped up the Eddie Cap Tutorial for us all. We can picture mamas and grandmas and really anyone who sews and knows a little boy […]
Posted by Mushroom Villagers Offers Child’s Cap Tutorial | HTC Retail on September 13, 2017 at 10:28 am
[…] For more information, visit https://mushroomvillagers.wordpress.com/the-eddie-cap-tutorial/ […]
Posted by Emma on February 7, 2018 at 5:25 am
Love this little cap! Any suggestions on how i could make it adjustable? I’d like to make one for my young infant son who’s head is growing quickly. Would like it to last longer than a few months. Thanks in advance.
Posted by Debra De Shazor on March 17, 2018 at 11:53 pm
Thank you, Love it!!
Posted by Cindy in GA on April 29, 2018 at 4:30 am
Nice job on the tutorial! I’ll be watching for more!
Posted by Kepurės su snapeliu | Sinngle on May 15, 2018 at 11:37 am
[…] […]
Posted by Freebook-Sammlung: Mützen und Co. für Kinder und Babies | SewSimple on October 28, 2018 at 6:34 am
[…] Eddie-Cap aus Wollstoff von Mushroom Villagers […]
Posted by Gino Teagle on November 12, 2018 at 6:45 am
Thanks For Sharing
Posted by Is Eddie There? – Annelyse on November 21, 2018 at 3:24 pm
[…] waagde me aan de Eddie Cap … een geweldig petje, met een duidelijke tutorial. Aangezien het enige geschikte stofke een […]
Posted by Craft: 37+ DIY Tutorials to Make a Newsboy Cap – CrochetingHearts.org on October 19, 2019 at 10:02 am
[…] 2. Newsboy Cap with Snap Tutorial […]
Posted by Teodoro Gutierrez on April 10, 2020 at 5:16 pm
muy bueno gracias
Posted by 101 Fall Sewing Tutorials {Free Patterns You’ll Love!} - EverythingEtsy.com on September 23, 2020 at 7:37 pm
[…] The Eddie Cap Tutorial – Mushroom […]
Posted by James A Foster on January 13, 2022 at 6:31 am
Great blog