
For this simple project, I’ll give you the basic dimensions and steps to make your own CD Poket to hold 6 CDs with the finished size of 5 1/2″ x 7″. You can make yours larger or smaller by easily adjusting the amount of pockets.
Supplies:
- 29 1/2″ x 12 1/2″ piece of fabric or I just used 2 Fat Quarters
- Thread
- Thick fusible interfacing, cardboard or batting (basically something to add shape and stiffness to your poket)
- Sewing machine
- Scissors, rotary cutter and mat
- Ruler
- Straight pins
- Iron
*This tutorial is meant for personal use. Please don’t sell CD Pokets made from these instructions.
1. Cut one piece of each size from your fabric:
(A) 8 1/2 x 12 1/2 (This will be the back)
(B) 8 x 12 1/2
(C) 7 x 12 1/2
(D) 6 x 12 1/2 (This will be the front)

2. Hem pieces B, C & D along one long side:
Fold and press 1/4″ along the length of each piece.
Then fold and press 1″ to form the hem.

Sew the bottom edge of the hem on wrong side as close as possible to the edge. If you want, you can also stitch along the top of the hem for a crisp edge.
3. Sew seams for each pocket:
Place piece B on piece A with right sides facing up and the bottom edges lined up. Mark a parallel line 4″ from the top of piece B across the entire length of B. Sew A & B together along your line.
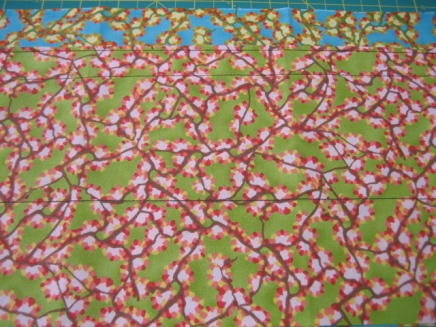
Place piece C on piece B as above and mark line again 4″ from the top of piece C. Sew A, B & C together along your marked line. (If your seams aren’t perfectly straight, like mine, you can simply adjust each piece to make your hems line up nicely. Just make sure you trim off any excess fabric on the sides and bottom so that all the layers match up with the bottom piece A. )

Place piece D on of all others. (You will not have to sew this one in place since it will be done when the bottom seam is put in.)

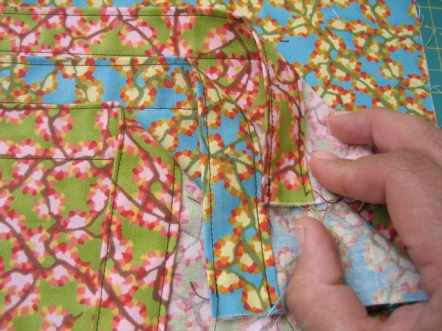
4. Pin layers together and with right sides together, fold in half. Pin again through all layers making sure the hemmed edges match up.

5. Starting at the bottom right corner, sew, (using 5/8″ seam allowance), across bottom, along raw edge and about a fourth of the way across the top. Leave a small opening for turning.
If you want all your seams to match and a nice tight pocket, also sew along the edge of the folded side.
6. Clip corners and turn right side out using a pencil to push out corners.

7. Cut interfacing to size that will fit inside your pocket.

Roll and stuff into poket. Straighten and smooth interfacing then iron entire poket.

8. Fold in raw edges of opening to match up with the seamed edge and pin. Sew along entire top as close to the edge as possible.

Yay, you’re done!

Please feel free contact me if you have any questions. If you make your own CD Poket using my tutorial, I’d love to see it! Please add your picture to the Flickr CD Poket group.


Posted by mommiemarzie on June 16, 2007 at 10:57 pm
YAY! I can’t wait to try it out. Thank you so much!
Posted by Mona on June 17, 2007 at 9:07 am
Thank you for this wonderful idea!! I think I will start it right away 🙂
Posted by Beth on October 4, 2007 at 10:03 pm
Hi, Irene… Would you mind emailing me (can’t find your address) at your convenience? I’d like to ask permission to link to your fantastic tutorial for an upcoming Sew, Mama, Sew feature. Thanks so much! –Beth
Posted by Jen on November 19, 2007 at 4:10 pm
Wonderful tutorial! I came across it from the Sew Mama Sew website and I can’t wait to make it! I’ve been having trouble thinking up a gift for a friend and you’ve just inspired me to make this for her!
Posted by Trintje on November 19, 2007 at 4:27 pm
so, could I add velcro straps so it could be hung from the visor??? I want to make a big one for my BIL for Chirstmas…
Posted by Irene on November 19, 2007 at 5:48 pm
Trintje-
I’m sure you could… or maybe elastic. You could attach it to the bottom and top seams before closing. Make sense?
Posted by kaitlyn on November 19, 2007 at 9:16 pm
Thanks so much for posting this! Its just what I’ve been hoping for to hold the program discs for my embroidery machine 🙂
Posted by Liz on November 20, 2007 at 3:50 am
What fabric is that? It is so pretty! Could you email it to me? Thanks so much I love your tutorial.
Posted by mom2fur on November 21, 2007 at 7:50 pm
This looks like fun! I think I’m going to make one especially for my Christmas CDs! Thanks for posting this tutorial!
Posted by Sew,Mama,Sew! Blog » » November 19 ~ Tech Gifts on January 25, 2008 at 12:54 am
[…] “Poket” Irene’s CD “Poket” Tutorial via her blog, Mushroom Villagers, is a unique, easy and rewarding project sure to be welcomed for […]
Posted by Sew,Mama,Sew! Blog » » Flickr Feature ~ Irene, Mushroom Villagers on January 25, 2008 at 1:52 am
[…] Pez fabric. It holds six CDs, fits perfectly in a slot in the dash and Irene is going to do a tutorial for us all on her blog! Yippee! It’s coming soon so be sure to check her blog, Mushroom […]
Posted by Wallets/Pouches/Accessories « this mom sews on March 14, 2008 at 3:23 pm
[…] CD Poket (mushroom villagers) […]
Posted by amanda on April 4, 2008 at 4:54 pm
this is sooo great! thank you for sharing! 🙂
Posted by Scrap Happy Update: More Fabric Scraps & Remnant Ideas » TipNut.com on May 3, 2008 at 7:11 am
[…] CD Pockets […]
Posted by More Trees Please « Mushroom Villagers on July 1, 2008 at 5:59 am
[…] CD Poket Tutorial […]
Posted by Stoff-Junkie.de » Blog Archive » Neue Links on August 3, 2008 at 7:17 am
[…] CD-Hülle […]
Posted by Tutorials to Try « The Purple Daisy’s Weblog on October 20, 2008 at 7:27 pm
[…] ~<CD Pocket>~ I use mine to carry CD’s in my bag on the weekends when I’m stuck in other people’s cars without good music. :o) […]
Posted by Le Borse di Gaya » o caspita! È già domenica!! on November 16, 2008 at 10:56 am
[…] la settimana scorsa ve ne ho pubblicati due post per sbaglio quindi oggi solo tre rapidissimi:Un porta cd da Mushroom […]
Posted by More personalized gifts | turning*turning on February 2, 2009 at 8:10 pm
[…] a car. This, naturally, had him pretty upset. So, I designed this illustration and made it into a CD Poket to hold music and books on tape. I also bought him a trial subscription to audible.com to help […]
Posted by DONNA on March 13, 2010 at 2:28 am
Great idea….thinking of using it as a game prize at an upcoming shower !
Posted by Sewing ~ CD Holder « mamallamapalooza on December 28, 2010 at 9:03 pm
[…] But Mama and Papa Llama forgot to get her some CD storage. A short Google search found a simple tutorial for a CD holder perfectly sized for a 4 year-old child. It holds 6 CDs (3 on each side) and it took less than an […]
Posted by Tons of Tutes- Odds & Ends on July 1, 2012 at 12:55 am
[…] CD “Pocket” […]
Posted by Tons of Tutes- Home & Office on July 1, 2012 at 1:01 am
[…] CD “Pocket” […]
Posted by becky Little on February 5, 2013 at 1:43 pm
I was wondering if you would allow me to sell these on a small scale design. For local craft stalls etc?
Posted by Irene on February 5, 2013 at 6:40 pm
Thank you so much for taking the time to ask Becky! I think it would be fine for you to sell these on a small scale. Good luck!
Posted by November 19 ~ Tech Gifts | Sew,Mama,Sew! Blog | on June 2, 2013 at 3:15 pm
[…] “Poket” Irene’s CD “Poket” Tutorial via her blog, Mushroom Villagers, is a unique, easy and rewarding project sure to be welcomed for […]
Posted by Marti on November 3, 2013 at 5:41 pm
This is so lovely!! I shared it this week at my Thanksgiving 30 Days of Gifts. You can see it here…http://sewlicioushomedecor.com/sew-thanksful-series-pin-cushions-day-2/. 🙂
Marti
Posted by Tons of Tutes- Odds & Ends | My great WordPress blog on August 13, 2014 at 6:37 pm
[…] CD “Pocket” […]
Posted by Tons of Tutes- Toys, Games, & Accessories | My great WordPress blog on August 13, 2014 at 6:39 pm
[…] CD “Poket” […]
Posted by Tons of Tutes- Home & Office | My great WordPress blog on August 13, 2014 at 6:45 pm
[…] CD “Pocket” […]
Posted by Christie on February 24, 2021 at 10:01 pm
This is great! How would I add two more pockets? What size do you think I should cut them?